
Sterilizing Surgical Tools using Remote Sensing and Actuation
Summary
For this project, I will be in a team to design a system which can secure surgical tool to an autoclave for sterilization in a virtual environment. This project consists of rapid prototyping and physical computing. In our team they're will be two sub teams, a computing team and a modelling team. The computing team will design a computer program to control the movement of a robotic arm to pick up and transfer a container for sterilization. The design team will design and prototype the container so that it is able to securely hold surgical tools in place during the transfer.

Objectives
1. Identify the means of picking up and transferring to an autoclave for sterilization.
-
Determine attributes that our container should have(i.e. objectives).
-
Determine restrictions for our container (i.e. constraints).
-
Determine functions that the container is able to perform.
2. Design a container which is able to hold medical tools securely for sterilization.
-
The modeling sub team will design a container which allows the sterilization and secure transfer of the surgical tools inside.
3. Design a computer program that interfaces with Quanser Interactive Labs using to muscle sensor emulators.
-
Determine XYZ location of pick up platform
-
The ID of the container object placed on the pick-up platform (in terms of size and color) is randomly selected from a list of 6 unique container’s
-
Each container object must be transferred to 1 of 6 autoclave bin locations
-
Each XYZ bin location is unknown and needs to be determined
-
-
The Q-arm moves, transferring the container object to the correct autoclave bin location
-
The Q-arm releases the container object by opening the gripper
-
For large containers only, the autoclave drawer corresponding to the color of the container object is opened
-
The above steps repeat until all 6 container objects have been successfully placed in the correct autoclave bins, at which point the program terminates.
4. The final objective is to present our design at a scheduled where we justify design decisions by answering questions asked individually and as a team.

Milestones
Milestone 0
For milestone 0, we assigned each member of the team a role. I was assigned the administrator role, so my job is to monitor the progress of the deliverables, submit the team deliverables and to create the final Gantt chart.

Milestone 1
For this milestone, we are individually supposed to conceptualize a design for our container which needs to be able to get picked up, put in in autoclave, transferred and allows sterilization. We need to determine a set of objections, functions and constraints for our container. Last thing we need to do is draw a concept sketch. Then as a team we share our results and make a morphological chart for our design.


Our objectives, functions and constraints pooled together.
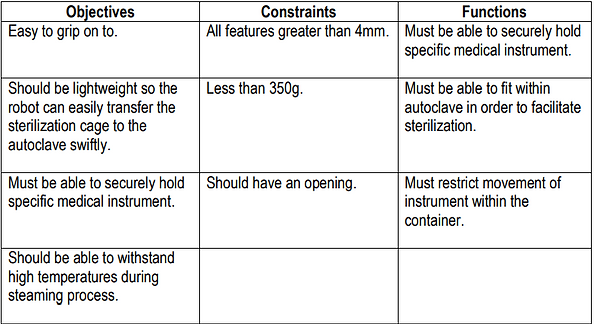
From this we have determined our primary objective for our system be able to securely hold specific medical instruments.
Some secondary objectives we procured:
-
The container must be able to fit within autoclave in order to facilitate sterilization.
-
the container should be able to withstand high temperatures during steaming process.
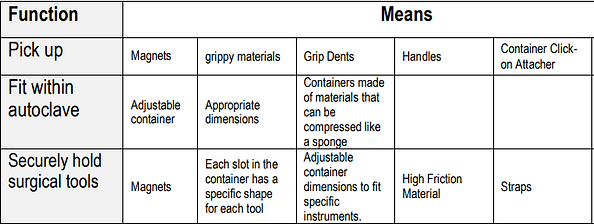
Lastly we are required to identify multiple means to perform the secondary functions.
Milestone 2
For this milestone we are required to conceptualize how the container will securely hold the tool in place during pick up, transfer and sterilization. To show case this, each member of the modelling sub-team (me and one other team mate) will need to create a refined concept sketch. Once that is completed, we share our sketches with each other and build a low fidelity prototype container based on the sketch.
For the modelling sub-team, the two members needs to conceptualize the operation of the robotic arm for transferring picking up, transferring, and dropping off containers. To showcase this, each member will describe the workflow of the entire system through a flow chart. Then each computing sub-team member will exchange their flowchart for peer-review, documenting similarities and differences between them. Then they will translate their ideas into pseudo code, outlining the level the high level workflow of the program.
.
Modelling Sub-Team
My team mates concept sketch on the top, and my low fidelity prototype on the bottom.
.


My team mates concept sketch is the first image and my low fidelity prototype is the second image.
.
After we have built out prototypes, we discussed about the advantages and disadvantages of each model. Checked to see if it aligned with out list of objectives, functions and constraints from milestone 1. Checked the reliability for becoming up the container and securing the medical tool inside it.
Computing Sub-Team
The flowcharts of each computing sub-team

Sub-team member 1 flow chart

Sub-team member 2 flow chart
Sub-team member 1 flow chart
As a team the computing sub-team needed to find any similarities and differences between their flow charts. They found that:
-
Both flowcharts include different steps for each size of container.
-
One flowchart outlines the process of identifying the container type and corresponding autoclave bin.
-
Structures are similar for the opening and closing of autoclaves bins
-
Structures are different for the movement of Q-ARM bot to get to target XYZ locations
-
First flow chart identifies container by color first, unlike second flow chart/.
In the end, the computing sub-team wrote out a pseudocode outlining the high-level workflow of your computer program as shown on the image to the left. The program focuses on how the program achieves the high-level objective rather than how each of the various tasks are executed.
Milestone 3
For milestone 3, the design sub-team will be creating a prelimanary solid model of the sterilization container in Autodesk Inventor. The computation sub-team will plan how each of the program tasks will be executed, identifying the inputs, processes and outputs.
Modeling
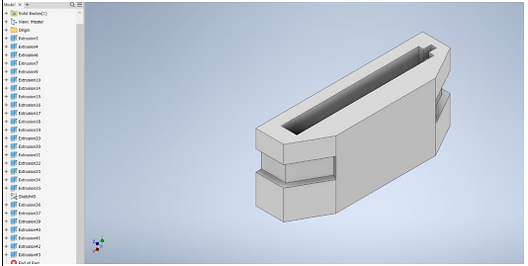
For our preliminary design, we need to create a sterilization container that is able to securely hold our surgical tool, which is the scalpel handle. Moreover, our container must fit in the sterilization box. Based on the the sterilization box and the feedback we got from out previous milestone, we decided to take on an entirely new design.


My Preliminary Solid Model
Teamate's Preliminary Solid Model


At last, we evaluate our 2 models in a Pugh matrix against a reference design datum (image on the left). Then we gave each other feedback for to improve our design. For my design, I was told it would be a good idea to add holes so that will get sterilized better. Adjusting handles so that the autoclave can get a better grip. For Joseph’s design, I said a more secure hold would be helpful for holding the tool in place.


Computation
Each team member of the Computation Sub-Team is required to write a function in Python that achieves the following tasks: 1) Identify Autoclave Bin Location and 2) Move End-Effector. Once that is complete The members of the computation sub-team will peer review eachothers code and provide feed back on it.


Lastly, the computing sub-team will write out the pseudocode for each of the remaining tasks in your computer program in the space below.
Milestone 4
In the final stage of this project, we will be presenting out design in a scheduled interview. During the interview, we will explain our design and justify design decisions by answering questions asked individually and as a team. For the modelling sub-team this includes verifying that the 3D fabrication of our container design can securely hold the surgical tool in place. For the Computation Sub Team, this includes verifying all 6 container objects are able to be identified, picked up and successfully placed in the corresponding autoclave bin location.
For our last milestone, we will prepare for the scheduled interview by having a similar interview with out TA, and recording the feedback our TA gives us.
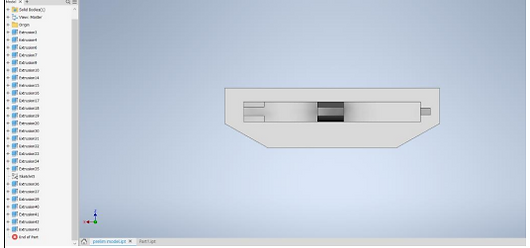
Our final design is our design from milestone 3, based on that design we got the following feedback.
Modeling
First image is the feedback given to us, and the second is refinement we need to make based on the feedback. Some requirements we had were that the print time needs to be less than 2 hours and under 350 grams. With support our design exceeded the 2 hour time limit, so we needed to trim it down.


Computation
The computing sub-team needed to comment their code, and add a specific threshold value to each individual function rather than just the main function.

I learned from the feedback and implemented it on our design. I trimmed down the model to minimalize material used and so that the print time will be under 2 hours.

Final Deliverable
Milestone 1

Means to perform secondary functions

Milestone 2
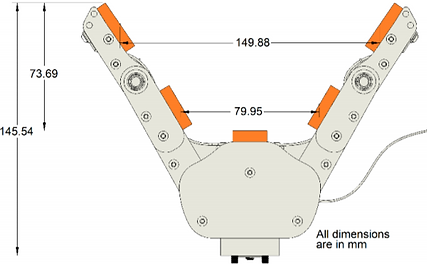
Walls are thick and made of a foamy material that can be compressed if grabbed on to so that it will be stable something is holding it. The top slit is designed for specific tools. Can be switched out.

Low-fidelity prototype

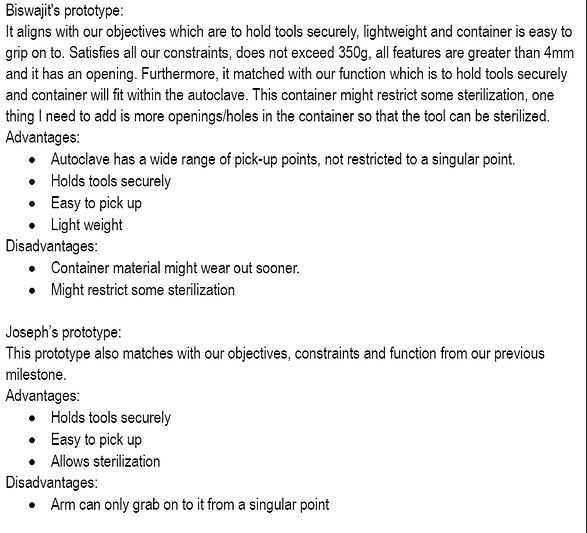
It aligns with objectives which are to hold tools securely, lightweight and container is easy to grip on to. Satisfies all constraints, does not exceed 350g, all features are greater than 4mm and it has an opening. Furthermore, it matched with the function which is to hold tools securely and container will fit within the autoclave. This container might restrict some sterilization, one thing that should be added is more openings/holes in the container so that the tool can be sterilized.
Advantages:
-
Autoclave has a wide range of pick-up points, not restricted to a singular point.
-
Holds tools securely
-
Easy to pick up
-
Light weight
Pseudocode outlining the high-level workflow of the computer program
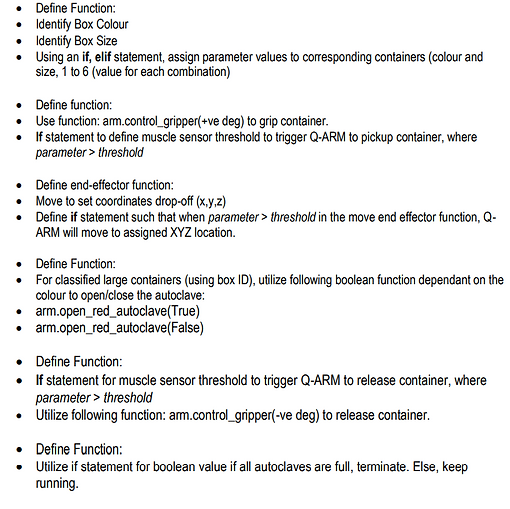
• Define Function:
• Identify Box Colour
• Identify Box Size
• Using an if, elif statement, assign parameter values to corresponding containers (colour and size, 1 to 6 (value for each combination)
• Define function:
• Use function: arm.control_gripper(+ve deg) to grip container.
• If statement to define muscle sensor threshold to trigger Q-ARM to pickup container, where parameter > threshold
• Define end-effector function:
• Move to set coordinates drop-off (x,y,z)
• Define if statement such that when parameter > threshold in the move end effector function, Q-ARM will move to assigned XYZ location.
• Define Function:
• For classified large containers (using box ID), utilize following boolean function dependant on the colour to open/close the autoclave:
• arm.open_red_autoclave(True)
• arm.open_red_autoclave(False)
• Define Function:
• If statement for muscle sensor threshold to trigger Q-ARM to release container, where parameter > threshold • Utilize following function: arm.control_gripper(-ve deg) to release container.
• Define Function:
• Utilize if statement for boolean value if all autoclaves are full, terminate. Else, keep running
Milestone 3

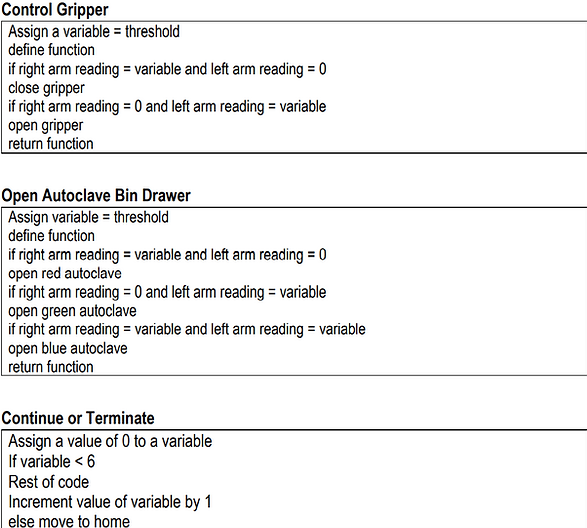
Pseudocode for each of the remaining tasks in the computer program

Milestone 4
Modeling
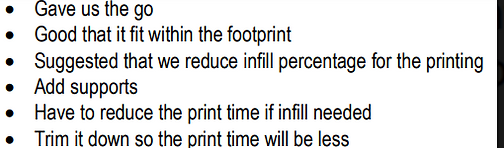
Mentor feedback for the design.
• Gave us the go
• Good that it fit within the footprint
• Suggested that we reduce infill percentage for the printing
• Add supports
• Have to reduce the print time if infill needed
• Trim it down so the print time will be less
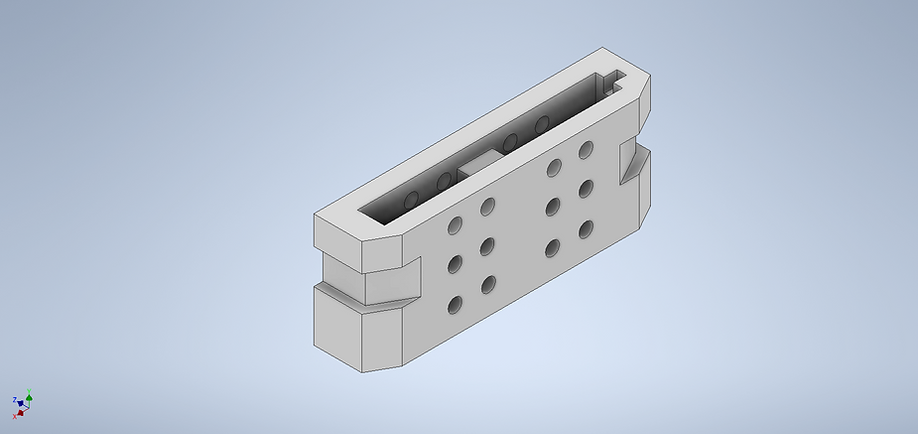
Design refinements based on the feedback
• Reduce the mass so that the print time is under two hours with the structural material added
• Have a print time under two hours with a reduced mass with good structural support and a good density of the box.
• The front side of the container is unnecessarily thick, it can be trimmed down to reduce print time.
• Due to our designing needing supports, which made the printing time over 2 hours, it needs to be trimmed down so it fits within out time range.
Computing
• Put Thresholds in functions, not in main function.
• Add comments to the file to help make it easier to understand.
• Use different threshold scenarios for each of the three functions, rather than the same one for all three.
Mentor feedback for the design.
Design refinements based on the feedback
Instead of having thresholds within main function, we will be implementing the thresholds in each necessary function, and to be solved within each function: move_end_effector(), control_gripper(), autoclave_bin()
We will have unique, and different thresholds for different functions. So, for instance for the move_end_effector() function we will rely on both arms being flexed, while the control_gripper() function will rely on only the left arm flexed and the right arm rested. The autoclave_bin() function will only rely on the right arm being flexed above a certain threhsold.
We will be adding comments to the code to give better insight to our thought process.